ほこりセンサー+M5StickCで室内ダスト濃度をモニタリング【Ambient】
前回の記事ではSHARPほこりセンサーGP2Y1010AUをArduino Unoで動作させました。実際の運用では長時間に渡る連続測定ログと、その瞬間の値をディスプレイ等で確認できると便利です。それらの目的を達するにはM5StickCが便利かと思い、試してみることにしました。
www.switch-science.com
配線
Arduino Unoの場合の配線と基本的に同じですが、LED駆動ピンと信号測定ピンはそれぞれ26pinと36pinに配線しました。こちらの記事によると26pinはdigitalWrite()に対応し、36pinはanalogRead()に対応しているようだったためです。
コード(M5Stickによる測定、表示まで)
基本的に前回も使用したsharpsensoruser氏のコードにM5StickC使用のコードを一部追加しただけになっています。
// Choose program options.
//#define PRINT_RAW_DATA
#define USE_AVG
#include <M5StickC.h>

// Arduino pin numbers.
const int sharpLEDPin = 26;   // Arduino digital pin 7 connect to sensor LED.
const int sharpVoPin = 36;   // Arduino analog pin 5 connect to sensor Vo.

// For averaging last N raw voltage readings.
#ifdef USE_AVG
#define N 100
static unsigned long VoRawTotal = 0;
static int VoRawCount = 0;
#endif // USE_AVG

// Set the typical output voltage in Volts when there is zero dust.
static float Voc = 0.6;

// Use the typical sensitivity in units of V per 100ug/m3.
const float K = 0.5;

/////////////////////////////////////////////////////////////////////////////

// Helper functions to print a data value to the serial monitor.
void printValue(String text, unsigned int value, bool isLast = false) {
  Serial.print(text);
  Serial.print("=");
  Serial.print(value);
  if (!isLast) {
    Serial.print(", ");
  }
}
void printFValue(String text, float value, String units, bool isLast = false) {
  Serial.print(text);
  Serial.print("=");
  Serial.print(value);
  Serial.print(units);
  if (!isLast) {
    Serial.print(", ");
  }
}

/////////////////////////////////////////////////////////////////////////////

// Arduino setup function.
void setup() {
  // Set LED pin for output.
  M5.begin();
  M5.Lcd.setRotation(3);
  M5.Lcd.fillScreen(BLACK);
  M5.Lcd.setTextSize(2);
  pinMode(sharpLEDPin, OUTPUT);

  // Start the hardware serial port for the serial monitor.
  Serial.begin(9600);

  // Wait two seconds for startup.
  delay(2000);
  Serial.println("");
  Serial.println("GP2Y1014AU0F Demo");
  Serial.println("=================");
}

// Arduino main loop.
void loop() {
  // Turn on the dust sensor LED by setting digital pin LOW.
  digitalWrite(sharpLEDPin, LOW);

  // Wait 0.28ms before taking a reading of the output voltage as per spec.
  delayMicroseconds(280);

  // Record the output voltage. This operation takes around 100 microseconds.
  int VoRaw = analogRead(sharpVoPin);

  // Turn the dust sensor LED off by setting digital pin HIGH.
  digitalWrite(sharpLEDPin, HIGH);

  // Wait for remainder of the 10ms cycle = 10000 - 280 - 100 microseconds.
  delayMicroseconds(9620);

  // Print raw voltage value (number from 0 to 1023).
  #ifdef PRINT_RAW_DATA
  printValue("VoRaw", VoRaw, true);
  Serial.println("");
  #endif // PRINT_RAW_DATA

  // Use averaging if needed.
  float Vo = VoRaw;
  #ifdef USE_AVG
  VoRawTotal += VoRaw;
  VoRawCount++;
  if ( VoRawCount >= N ) {
    Vo = 1.0 * VoRawTotal / N;
    VoRawCount = 0;
    VoRawTotal = 0;
  } else {
    return;
  }
  #endif // USE_AVG

  // Compute the output voltage in Volts.
  Vo = Vo / 1024.0 * 5.0;
  printFValue("Vo", Vo*1000.0, "mV");

  // Convert to Dust Density in units of ug/m3.
  float dV = Vo - Voc;
  if ( dV < 0 ) {
    dV = 0;
    Voc = Vo;
  }
  float dustDensity = dV / K * 100.0;
  printFValue("DustDensity", dustDensity, "ug/m3", true);
  Serial.println("");

  M5.Lcd.setCursor(0, 50);
  M5.Lcd.printf("%6.2f mg/m3", dustDensity);
  M5.Lcd.setCursor(0, 10);
  M5.Lcd.printf("Dust Density");

} // END PROGRAM
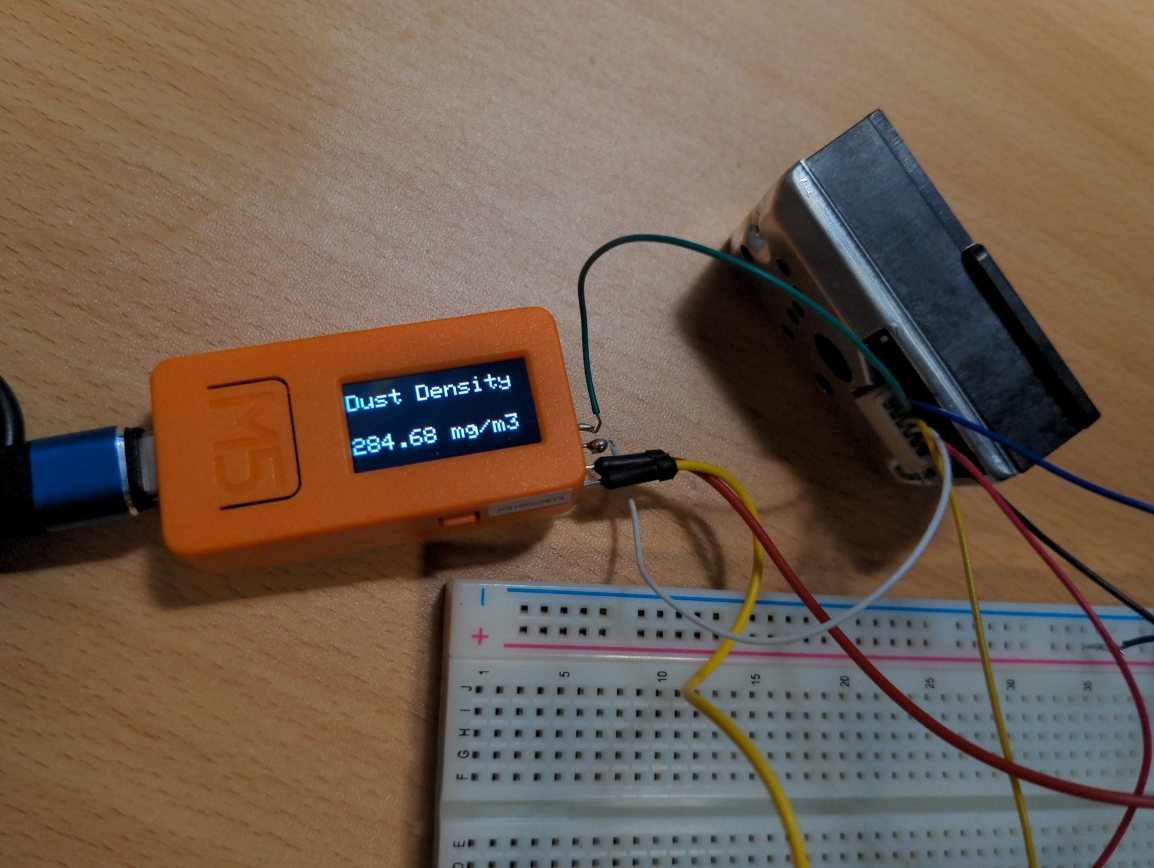
無事ディスプレイに最新のダスト密度が表示されました。

コード2(M5Stickによる測定、ディスプレイ表示、Wifi設定、Ambient送信まで)
先ほどのコードにWifi設定、Ambient送信までを追加しました。Ambientは過去の記事でも扱いましたが、非常に簡便に扱えるクラウドIoTサービスです。使用の際はサインインしチャネルIDとライトキーを控えておく必要があります。またAmbientサーバーへの送信頻度はあまり高くても仕方ないので、60回の測定に一回送信するようになっています。
#define USE_AVG
#include <M5StickC.h>
include "Ambient.h"

WiFiClient client;
Ambient ambient;

const char* ssid = "*****************"; //"自分の使うWifiのSSIDをここに書く"
const char* password = "*******************"; //"上記のパスワードを書く"

unsigned int channelId = 123456; // 自分のAmbientのチャネルIDに置き換える
const char* writeKey = "********************"; // 自分のAmbientのライトキーに置き換える

// Arduino pin numbers.
const int sharpLEDPin = 26;   // Arduino digital pin 7 connect to sensor LED.
const int sharpVoPin = 36;   // Arduino analog pin 5 connect to sensor Vo.

// For averaging last N raw voltage readings.
#ifdef USE_AVG
#define N 100
static unsigned long VoRawTotal = 0;
static int VoRawCount = 0;
#endif // USE_AVG
int count = 0;
// Set the typical output voltage in Volts when there is zero dust.
static float Voc = 0.6;

// Use the typical sensitivity in units of V per 100ug/m3.
const float K = 0.5;

/////////////////////////////////////////////////////////////////////////////

// Helper functions to print a data value to the serial monitor.
void printValue(String text, unsigned int value, bool isLast = false) {
  Serial.print(text);
  Serial.print("=");
  Serial.print(value);
  if (!isLast) {
    Serial.print(", ");
  }
}
void printFValue(String text, float value, String units, bool isLast = false) {
  Serial.print(text);
  Serial.print("=");
  Serial.print(value);
  Serial.print(units);
  if (!isLast) {
    Serial.print(", ");
  }
}

/////////////////////////////////////////////////////////////////////////////

// Arduino setup function.
void setup() {
  // Set LED pin for output.
  M5.begin();
  M5.Lcd.setRotation(3);
  M5.Lcd.fillScreen(BLACK);
  M5.Lcd.setTextSize(2);
  pinMode(sharpLEDPin, OUTPUT);

  // Start the hardware serial port for the serial monitor.
  Serial.begin(9600);

  // Wait two seconds for startup.
  delay(2000);
  Serial.println("");
  Serial.println("GP2Y1014AU0F Demo");
  Serial.println("=================");
}

// Arduino main loop.
void loop() {
  // Turn on the dust sensor LED by setting digital pin LOW.
  digitalWrite(sharpLEDPin, LOW);

  // Wait 0.28ms before taking a reading of the output voltage as per spec.
  delayMicroseconds(280);

  // Record the output voltage. This operation takes around 100 microseconds.
  int VoRaw = analogRead(sharpVoPin);

  // Turn the dust sensor LED off by setting digital pin HIGH.
  digitalWrite(sharpLEDPin, HIGH);

  // Wait for remainder of the 10ms cycle = 10000 - 280 - 100 microseconds.
  delayMicroseconds(9620);

  // Print raw voltage value (number from 0 to 1023).
  #ifdef PRINT_RAW_DATA
  printValue("VoRaw", VoRaw, true);
  Serial.println("");
  #endif // PRINT_RAW_DATA

  // Use averaging if needed.
  float Vo = VoRaw;
  #ifdef USE_AVG
  VoRawTotal += VoRaw;
  VoRawCount++;
  if ( VoRawCount >= N ) {
    Vo = 1.0 * VoRawTotal / N;
    VoRawCount = 0;
    VoRawTotal = 0;
  } else {
    return;
  }
  #endif // USE_AVG

  // Compute the output voltage in Volts.
  Vo = Vo / 1024.0 * 5.0;
  printFValue("Vo", Vo*1000.0, "mV");

  // Convert to Dust Density in units of ug/m3.
  float dV = Vo - Voc;
  if ( dV < 0 ) {
    dV = 0;
    Voc = Vo;
  }
  float dustDensity = dV / K * 100.0;
  printFValue("DustDensity", dustDensity, "ug/m3", true);
  Serial.println("");

  M5.Lcd.setCursor(0, 50);
  M5.Lcd.printf("%6.2f mg/m3", dustDensity);
  M5.Lcd.setCursor(0, 10);
  M5.Lcd.printf("Dust Density");

//ambient
  count++;
  if (count = 60){
  count = 0;
  WiFi.begin(ssid, password);
  while (WiFi.status() != WL_CONNECTED) {
    delay(500);
    Serial.print(".");
  }
  Serial.print("WiFi connected\r\nIP address: ");
  Serial.println(WiFi.localIP());

  ambient.begin(channelId, writeKey, &client); // チャネルIDとライトキーを指定してAmbientの初期化

  ambient.set(1,dustDensity);
  ambient.send();
  }//  Ambientにデーターを送信
} // END PROGRAM
動作確認
Ambientへも送信されていることが確認出来ました。

しかし問題として、前回Arduinoで測定したダスト密度より一桁高くなってしまっていることや、S/Nが悪くなっています。プログラムに修正が必要なものと思われます。